You can manage the Date Calendar's settings to change the year start date, the week start day, and display options in the slicer. To customize the calendar slicer's settings, open its settings dialog.
Accessing the Slicer Settings panel
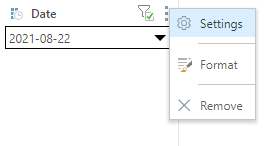
Configure the slicer preferences from the Slicer Settings panel. Start by clicking the slicer's context menu (ellipsis) and select Settings from the context menu:
The Slicer Settings panel opens along the bottom of the canvas. The panel features tabs along its left; each of which exposes options relating to various slicer settings.
Note: If your Slicer is a Binary Parameter, the dialog includes a subset of standard Slicer Settings, see Binary Parameter Settings in Discover Pro. For information about the standard Slicer Settings, see Slicer Settings in Discover Pro.
Slicer Settings
Type
The Type settings let you change the slicer's title and type:
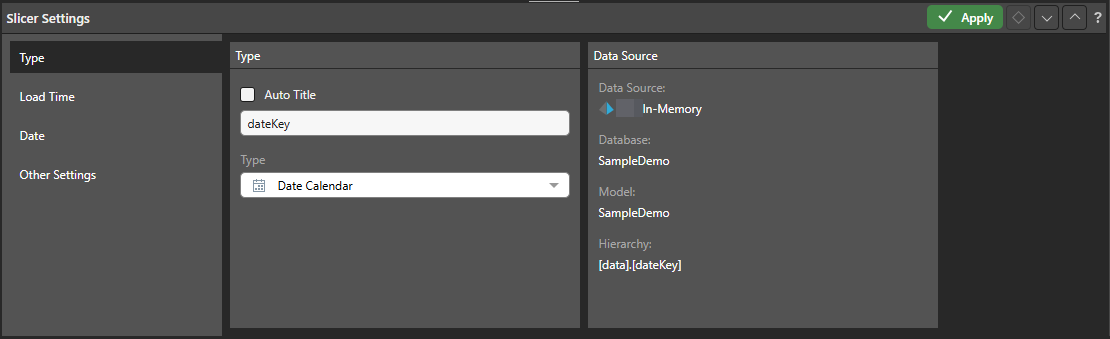
Auto Title
Select the Auto Title checkbox to disable the Title field and use the default name of the item as the title for your slicer:
- If the slicer is based on a hierarchy, this is the hierarchy name.
- If the slicer is based on a parameter, it is the parameter name as it appears in Content Manager.
Clear the Auto Title checkbox to enable the Title field, where you can type your own custom title for the slicer.
A new slicer's title defaults to the name of its underlying hierarchy or parameter. You can override this value manually or enable Auto Title in the Slicer Settings to keep the slicer's title automatically in sync with changes to the hierarchy or parameter name. This example shows how the name of a slicer appears throughout its lifecycle.
Adding the Parameter to the canvas (through its Formula) creates a slicer with a name that matches the parameter name:

If I change the value in the Slicer Settings Title field, the slicer name is overwritten with a custom name; in this case Gross Values:

If, instead of typing a new title, I selected the Auto Title checkbox in the Slicer Settings, the slicer title would be returned to its initial parameter name. However, now, if I were to rename the parameter, the slicer would be automatically updated to reflect the parameter's new name:

Tip: For more information about creating and using Binary parameters, as seen in this example, see Binary Parameters in Formulate.
Type
Select a slicer type from the dropdown list. Slicer types include dropdown lists, buttons, and so on. For a Date Calendar slicer, Date Calendar is selected from this dropdown list.
- Click here for more information about slicer types.
Data Source
The read-only data source metadata, including the data source, database, data model, and the hierarchy used in the filter.
Load Time
The load time settings determine which of the slicer's elements will be automatically loaded when the report is opened and can configure the slicer as a Pre-Query Slicer.
Initial Selection Mechanism
The initial selection mechanism determines which slice will be automatically loaded when the user opens the report.
Saved Selection by Name
Select the initial slicer selection by name when the report is opened.
Functional
Set the default slicer selection according to a specified date function. Selecting this option opens the Function Type dropdown list, where you can select the function type to apply to the initial slicer selection:
- Current <Period>: Select the current date, month, semester, quarter, or year in the slicer.
- First <Period>: Select the first date, month, semester, quarter, or year in the slicer.
- Last <Period>: Select the last date, month, semester, quarter, or year in the slicer.
- nTD: Select the week, month, quarter, or year to date in the slicer.
- Last # <Period>: Select the last available dates. Returns a date range.
- Next # <Period>: Select the next dates after the last available date. Returns a date range.
- Lag # <Period>: Select the single date that is earlier than the selected date by the specified number of periods. For example, the date that is 5 days earlier than the current date.
- Lead # <Period>: Select the single date that is later than the selected date by the specified number of periods. For example, the date that is 5 days later than the current date.
Disambiguation: The term "last" here refers to the latest period, not the last completed period; it aligns with the phrase "in the last month" rather than "last month" in colloquial English. For example, if today is January 15, "last month" in this sense means January, not December.
Subsequent Selection Options
Subsequent selection options determine whether the user's slicer selection will be saved. Any selection will override the Initial Selection Mechanism (above).
Remember user's last selection
Select the Remember user's last selection checkbox to save the current user's saved slicer selection. Each time the user saves the report, the currently selected slice will be saved, and that slice will be automatically loaded when the report is next opened by that user.
If this option is not enabled, the given Initial Selection Mechanism will be loaded every time the user opens the report.
Pre-Query Slicer
Pre-query slicers can be used to set the slicer selections for specified slicers and parameters on opening the discovery, before the query is loaded.
Enable
Select the Enable checkbox to indicate that the query should not be run until the user specifies their slicer selections. The effect of this selection is that the Pre-Query slicer dialog opens and the user is prompted to select either bookmarks or individual selections for their discovery, publication, or tabulation slicers in the Pre-Query slicer dialog.
Note: The Pre-Query slicer dialog opens automatically when you open the discovery, presentation, or tabulation in its app, the discovery in the Viewer, or the presentation at runtime. If you view the discovery or presentation in the Hub or as an Embedded visual, you will need to click the Make Pre-Selections option to open the Pre-Query slicer dialog.
Apply default load mode
Use the Apply default load mode checkbox to indicate which options should be selected in the Pre-Query slicer dialog by default:
- Select the checkbox to use the default slicer selection.
- Clear the checkbox to use the last selected slicer in the Pre-Query slicer dialog.
- Click here for more information about Pre-Query Slicers
Date
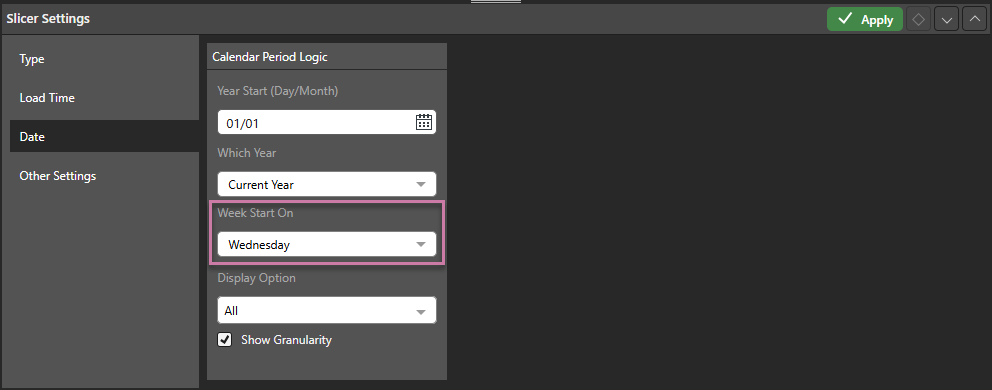
Year Start (Day/Month)
By default, the year start is set to 01 January, but this can be changed by selecting a month or date from the Year Start field. For example, you may want to change the year start to the beginning of the fiscal year.
Changes to the year start date are reflected in several of the date/ time groupings. For instance, if you set the year start to 01 July, then:
- Semester 1 will be the first 6-month period from 01 July.
- Q1 will reflect the first 3-month period from 01 July (July-September).
- The 7-day period beginning on 01 July is the first week of the year.
Which Year
Next, from the Next Year dropdown list, select if the year start is this year or next year. For example, if you're filtering for an academic year, beginning on 01 September, you need to choose if the start date (01 September) refers to that date this year, or that date next year.
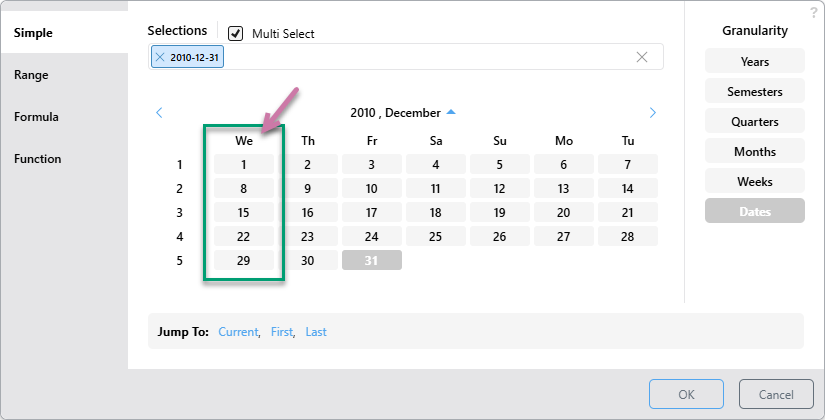
Week Start On
By default, the week start is set to Sunday. You can change the week start by selecting a different day from the Week Start On dropdown list. For example, if the week start is Monday in your organization, you can change the week start to Monday.
In the example above, Week Start On was set to Wednesday (purple highlight). This affects the Date Calendar as follows:
Display Option
From the Display Option dropdown list, choose the tabs that you want to include on the left of your Calendar Picker: Simple, Range, or Formula. The Formula checkbox shows and hides both the Formula and Function tabs as a group.
Show Granularity
By default, granularity is enabled, meaning you can change the granularity in the calendar picker to filter by a variety of date-time groups, like year, quarter, or week.
If you disable granularity, then only the Dates group is enabled in the Date Calendar.
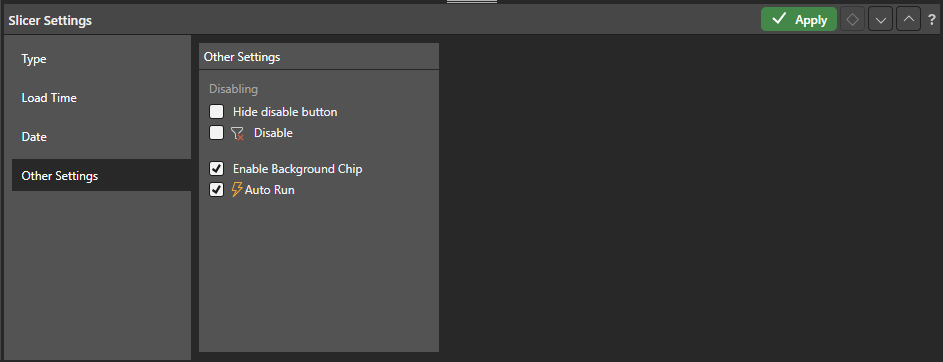
Other Settings
From the Other Settings tab, you can disable and enable the filter button, enable background chips, and configure auto run for the slicer:
Disabling
Each slicer features a filter button alongside its context menu. This button is used to enable and disable the filter as needed. The filter is enabled by default, meaning that whenever the report is opened in Discover or Present, it's automatically filtered.
The default filter behavior can be disabled (meaning that, by default, the visual will not be filtered unless the user enables the filter), or the filter button can be hidden entirely.
Hide disable button
Hide the disable button so that users cannot disable or enable the slicer.
Disable
Change the default slicer behavior to disabled. When the report is opened in Discover, it won't be filtered unless the user enables the slicer by clicking its filter button or making a slicer selection.
Filtering can also be enabled or disabled from the slicer itself, by toggling the funnel icon.
Enable Background Chip
Select this option to enable background filtering for single elements. Click here to learn more.
Auto Run
Controls the auto run behavior associated with this slicer. Clear the Auto Run checkbox to indicate that you do not want to apply new selections made from the slicer immediately. The purpose of this option is to allow users to only apply the filtering associated with their slicers once they are ready, perhaps once they have made all their intended slicer selections.
Enable or disable Auto Run for this slicer:
- When enabled, the filter applies automatically as soon as a new slice is selected. This is the default behavior.
- When disabled, the filter does not apply automatically (the query will not be run) when a new slice is selected; instead, a lightning bolt icon indicates that the slicer change needs to be applied manually.
- Click here for more information about Running Slicers